-40%
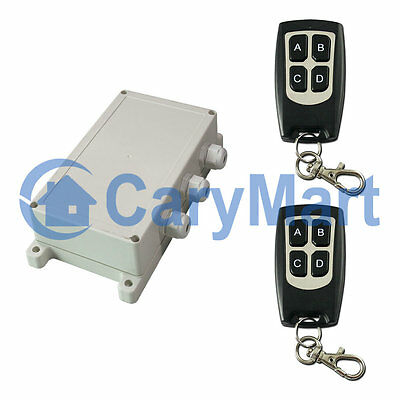
4 Channel Relay Output High Power Wireless Remote Control Kit Waterproof Case
$ 67.05
- Description
- Size Guide
Description
00205274 Channel Relay Output High Power Wireless Remote Control Kit Waterproof Case
Model: 0020444
Package Include:
1 x Receiver: S4PU-DC06 / S4PU-DC09 / S4PU-DC12 / S4PU-DC24
2 x Transmitter: CWB-4
1 x User manual
Feature:
Wireless control, easy to install
Control Lights, Motors, Fans, electrically operated Doors / Locks / Windows / Blinds / Cars or Other Appliances with AC110~240V or DC0~28V.
You can turn on/off the receiver with transmitter (remote control) from any place within a reliable distance; the wireless RF signal can pass through walls, floors and doors.
With characteristics of reverse power protection and over current protection
Audible / visual indication
Use microcontroller model of EM78P156, an 8-bit microprocessor designed and developed with low-power and high-speed CMOS technology.
Use ULN2003 to drive relay, with strong anti-interference.
Reliable control: The transmitter (Encoding) and the receiver (Decoding) use an 8-bit code.
One/several transmitters can control one/several receivers simultaneously.
If you use two or more receivers in the same place, you can set them with different codes.
Transmitting Frequency: 315MHz / 433MHz
Receiver:
Model No.: S4PU-DC09 / S4PU-DC12 / S4PU-DC24
Channel: 4 CH
Control Modes: Latched, Momentary, Toggle, Momentary + Toggle
Coding Type: Fixed code
Coding Setting: By learning
Power Supply (Operating Voltage): DC12V±1V (S4PU-DC12), DC9V±1V (S4PU-DC09), DC24V±1V (S4PU-DC24)
Working Voltage Range of Relay: AC110~240V or DC0~28V
PCB Size: 137mm x 80mm x 25mm
Case Size: 150mm x 90mm x 45mm
Maximum Working Current: 30A / each channel
Transmitter:
Model No.: 0021095 (CWB-4)
Waterproof
Channel/Button: 4
Button Symbol: A, B, C, D
Operating Voltage: 6V (2 x CR2016 -3V button cell batteries,, can be used for 12 months)
Operating Current: 5mA
Operating Frequency: 315Mhz / 433Mhz
Encoding Chip: PT2260/ PT2262 / PT2264
Encoding Type: Fixed code by soldering, up to 6561 codes
Transmitting Distance: 50m / 150ft (theoretically)
Modulation Mode: ASK
Operating Temperature: -20 ° C to +70 ° C
Unit Size: 56mm x 32mm x 12mm
Weight: 20g
How to set up the 8-bits code of the transmitter:
1. Open the transmitter shell, then you will see the circuit board. There are two rows pads and one row of chip feet on the back side.
2. The upper row of pads is “H” side, and the lower row of pads is “L” side.
3. If solder the middle row of chip feet to the “L” side, it is code 1. If solder the middle row of chip feet to the “H” side, it is code 2. Don’t solder to any side, it is code 0.
4. The 8-bits code order is from right to left (from D1 to D8).
5. Here is an example, the 8-bits code in the picture is 00001020, solder as the following way:
6. Code 0: don’t solder any side, like D1, D2, D3, D4, D6, D8.
7. Code 1: solder to the “L” side, like D5.
8. Code 2: solder to the “H” side, like D7.
Usage:
Setting different control modes (We have set the receiver as Toggle control mode before delivery. If you want to use other control modes, do as following operation):
Setting control mode Latched: Disconnect Jumper-1 and Jumper-2.
Control mode Latched (Channel 1~4): Press -> On, other relays Off; Press other button -> Off.
Such as:
Press button 1: Turn on relay 1 (connect A and B, disconnect A and C)
Turn off other relays (disconnect A and B, connect A and C)
Press button 2: Turn on relay 2 (connect A and B, disconnect A and C)
Turn off other relays (disconnect A and B, connect A and C)
Setting control mode Momentary: Only connect Jumper-1.
Control mode Momentary (Channel 1~4): Press and hold -> On; Release -> Off.
Such as:
Press and hold button 1: Turn on relay 1 (connect A and B, disconnect A and C)
Release button 1: Turn off relay 1 (disconnect A and B, connect A and C)
Press and hold button 2: Turn on relay 2 (connect A and B, disconnect A and C)
Release button 2: Turn off relay 2 (disconnect A and B, connect A and C)
Setting control mode Toggle: Only connect Jumper-2.
Control mode Toggle (Channel 1~4): Press -> On; Press again -> Off.
Such as:
Press button 1: Turn on relay 1 (connect A and B, disconnect A and C)
Press button 1 again: Turn off relay 1 (disconnect A and B, connect A and C)
Press button 2: Turn on relay 2 (connect A and B, disconnect A and C)
Press button 2 again: Turn off relay 2 (disconnect A and B, connect A and C)
Setting control mode Momentary + Toggle: Connect Jumper-1 and Jumper-2.
Control mode Momentary (Channel 1, 2): Press and hold -> On; Release -> Off.
Press and hold button 1: Turn on relay 1 (connect A and B, disconnect A and C)
Release button 1: Turn off relay 1 (disconnect A and B, connect A and C)
Press and hold button 2: Turn on relay 2 (connect A and B, disconnect A and C)
Release button 2: Turn off relay 2 (disconnect A and B, connect A and C)
Control mode Toggle (Channel 3, 4): Press -> On; Press again -> Off.
Press button 3: Turn on relay 3 (connect A and B, disconnect A and C)
Press button 3 again: Turn off relay 3 (disconnect A and B, connect A and C)
Press button 4: Turn on relay 4 (connect A and B, disconnect A and C)
Press button 4 again: Turn off relay 4 (disconnect A and B, connect A and C)
Learning the button of remote control:
1) Press the button of receiver; signal LED on the receiver keeps shining. The receiver enters into status of LEARNING.
2) Press any one button on remote control. If signal LED flashes quickly 15 times and turns off, it means learning is successful.
3) When receiver is in the status of LEARNING, press again the button of receiver, signal LED turns off, learning process will be discontinued.
4) The receiver can learn several remote controls with different codes.
Delete all transmitters:
We have learned remote control to the receiver. If you don’t want the receiver to work with the remote control, you can delete all codes of remote controls, which are stored in the receiver.
Operation: Press and hold the button of receiver until signal LED flashes slowly; release the button, LED keeps slow flash. That means all stored codes have been deleted successfully.
Shipping:
Shipping methods: Ship to Worldwide by Airmail.
Delivery time: 10~25 working days (not including week-end and holiday).
We will ship the item to your shipping address of PayPal within 1~2 working days after clearance of payment.
Please contact us immediately if you want to change your shipping address. We are not responsible for wrong address.
We will inform you via Email when shipping your items.
Guarantee:
Guaranty: One year, if the products have any quality problem, we will resend the same unit to you by free, but you need to defray the postage.
